Loading...
Loading...
Loading...
Loading...
Loading...
Loading...
Loading...
Loading...
Loading...
Loading...
Loading...
Loading...
Loading...
In reality the regexp used in this gif doesn't work server side, the regexp pattern should be ^[^@]@gmail\.com$ (the RegExp should match the whole string) 😬.
User Profile is a Keycloak feature that enables to define, from the admin console, what information you want to collect on your users in the register page and to validate inputs on the frontend, in realtime!
NOTE: User profile is only available in Keycloak 15 and it's a beta feature that needs to be enabled when launching keycloak and enabled in the console.
Keycloakify, in register-user-profile.ftl, provides frontend validation out of the box.
For implementing your own register-user-profile.ftl page, you can use import { useFormValidationSlice } from "keycloakify";.
Find usage example here.
As for right now it's not possible to define a pattern for the password from the admin console. You can however pass validators for it to the useFormValidationSlice function.
Test and debug your theme
When building your page you want to see the result of your edit live.
To acheave that with Keycloakify simply eddit:
See the getKcContext() call in the keycloakify-demo-app project.
See the getKcContext() call in the keycloakify-demo-app#look_and_feel project.
then if you run yarn start you will see your login page display. Dont forget to remove mockPageId before releasing 😉.
The page is loaded with a default mock context.
To customize the mock kcContext please refer to this example.
Once you are done developping you want to test in an actual Keycloak instance to see if everything is working as expected.
Please refer to the related instruction printed on the console when running yarn keycloak in your project.
Customize the default email template
Introduced in v4.8.0
It is now possible to customize the emails sent to your users to confirm their email address ect.
Just run npx create-keycloak-email-directory, it will create a keycloak_email directory at the root of your project.
This directory should be tracked by Git (yarn add -A) You can start hacking the default template.
When npx build-keycloak-theme (yarn keycloak) is run, if the directory keycloak_email exists at the root of your project, it will be bundled into your .jar file and you will be able to select it in the Keycloak administration pages.
It's a good idea to first read this quick start section to understand the basic of how Keycloakify works.
However, we recommend you start hacking from instead of setting up Keycloakify from scratch.
Save yourself some time, have quick look at the . Windows users in particular!
On the console will be printed all the instructions about how to load the generated theme in Keycloak
The first approach is to only customize the style of the default Keycloak login theme by providing your own class names.
src/index.tsx
The above snippet of code assumes you are in a react project wich only purpose is to be a Keycloak theme.
But if you want to make your keycloak theme an integral part of a preexisting React app you would apply the following modification to the above snipet:
To give you an idea of what you can already achieve by only customizing the style the style,
The keycloakify components are a plain React translation of the default theme that comes with Keycloak v11.0.3.
You can download the FTL/CSS source files the components are based on with the following command:
npx -p keycloakify download-builtin-keycloak-theme
If you want to go beyond only customizing the CSS you can re-implement some of the pages or even add new ones.
Specific instruction on how to proceed will be printed in the console with yarn keycloak.
What to do if you need to edit messages_xx.properties
In Keycloakify you can't directly eddit the messages_xx.properties files, the way to go it to reproduce ( don't forget to ).
This approach is a bit hacky as it doesn't provide type safety, it needs to be improved.
In the meantime see for other workarounds.
This project only support out of the box the most common user facing pages of Keycloak login.
To see the complete list of pages that Keycloak provide you can download the base theme with the following command
npx -p keycloakify download-builtin-keycloak-theme
Most Keycloakify component are based on the base theme of Keycloak v11.0.3 ().
are the pages currently implemented by this module.
Keycloakify also enables you to declare custom ftl pages.
Check out how my-extra-page-1.ftl and my-extra-page-2.ftl where added to .
Main takeaways are:
You must declare your custom pages in the package.json.
(TS only) You must declare theses page in the type argument of the getter function for the kcContext in order to have the correct typings.
(TS only) If you use Keycloak plugins that defines non standard .ftl values (Like for example that define authorizedMailDomains in register.ftl) you should declare theses value to get the type.
You should provide sample data for all the non standard value if you want to be able to debug the page outside of keycloak.
process.env.PUBLIC_URL not supported.You won't be able to . (This isn't recommended anyway).
@font-face importing fonts from the src/ dirIf you are building the theme with this limitation doesn't apply, you can import fonts however you see fit.
We have a fonts/ directory in src/
We import the font like this in a .scss a file.
If it is possible, use Google Fonts or any other font provider.
As of now Keycloakify only enable you to create a theme that covers the Login pages and the emails. Acount and Admin Console aren't supported yet.
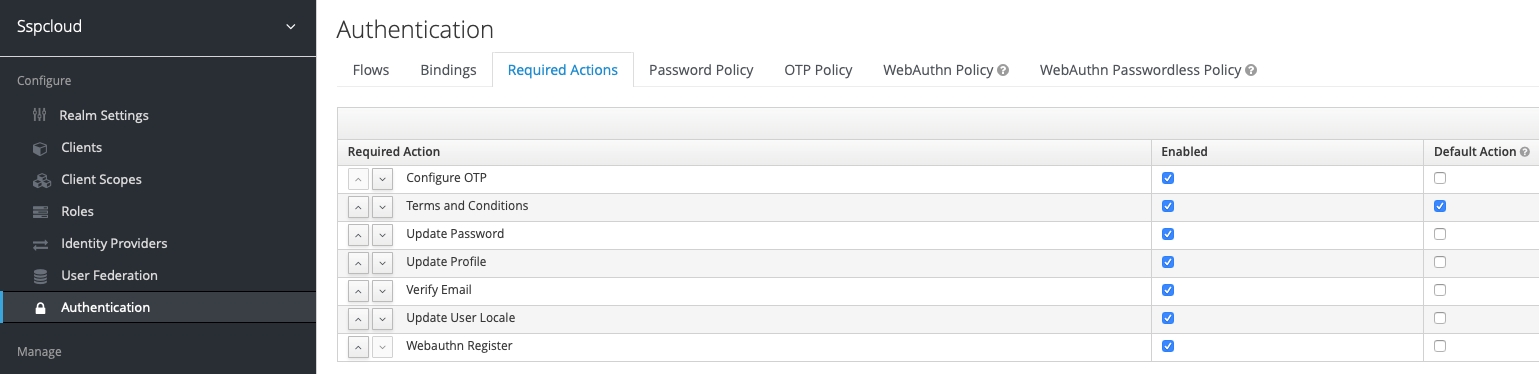
Many organizations have a requirement that when a new user logs in for the first time, they need to agree to the terms and conditions of the website.
First you need to enable the required action on the Keycloak server admin console:
Enable loading in a blink of an eye of login pages with --external-assets
This only apply if your theme is integrated to to a React app.
If your Keycloak theme is a standalone react project you can ignore this section.
By default when your users reach the login pages all scripts, images and stylesheet are downloaded from the Keycloak server. If you are specifically building a theme to integrate with an app or a website that allows users to browse unauthenticated before logging in, you will get a significant performance boost if you jump through those hoops:
Provide the url of your app in the homepage field of package.json. or in a public/CNAME file. .
Build the theme using npx build-keycloak-theme --external-assets
Enable on the server hosting your app. .
Make sure not to build your app and the keycloak theme separately (run yarn keycloak only once in your CI) and remember to update the Keycloak theme every time you update your app.
Be mindful that if your app is down your login pages are down as well.
Checkout a complete setup
Only allow specific emails to register.
Using user profile capabilities of keycloak you can define a Regexp on the email field that will only allow certain domails to register.
The Regexp should look and can be generated easily with .
Find the source code of the register page showed in the video .
The legacy way of doing it would be with and usingkcContext["authorizedMailDomains"] to validate in realtime.
Relevent code and .
Here is that produces:
then select version 11.0.3 ().
If you want to go this way checkout the demo setup provided . If you prefer a real life example you can checkout . The web app is in production .
See also for more info on how to add support for extra ftl pages.
.
If you want to host your font recommended approach is to move your fonts into the public directory and to place your @font-face statements in the public/index.html.
Example (and the font are ).
If you can't or wont move your @font-face statements in the public/index.html, you can still , you will need to enable for your font files, even on the same domain.
If you are missing this feature .
Then you'll have to do .
This tool will be maintained to stay compatible with every Keycloak version starting from Keycloak Version 11.
However, the default pages you will get (before you customize them) will always be the ones of Keycloak v11.0.3 and some extra pages that didn't existed back then like register-user-profile.ftl.
If you aren't trying to integrate the theme with a preexisting react app, save yourself some time and just use create-react-app.
mvn (Maven), rm, mkdir, curl, unzip.
docker must be up and running when running start_keycloak_testing_container.sh
If you ever encounter one of these errors:
It's just noise, they can be safely ignored. You can, however, and are encouraged to, report any that you would spot. Just open an issue about it and I will release a patched version of Keycloakify in the better delays.
If, before logging in, a user has selected a specific language you don't want it to be reset to default when the user gets redirected to the login or register pages.
Same goes for the dark mode, you don't want, if the user had it enabled to show the login page with light themes.
The problem is that you are probably using localStorage to persist theses values across reload but, as the Keycloak pages are not served on the same domain that the rest of your app you won't be able to carry over states using localStorage.
The only reliable solution is to inject parameters into the URL before redirecting to Keycloak. We integrate with keycloak-js, by providing you a way to tell keycloak-js that you would like to inject some search parameters before redirecting.
The method also works with @react-keycloak/web (use the initOptions).
You can implement your own mechanism to pass the states in the URL and restore it on the other side but we recommend using powerhooks/useGlobalState from the library powerhooks that provide an elegant way to handle states such as isDarkModeEnabled.
Let's modify the example from the official keycloak-js documentation to enables the relevant states of our app to be injected in the URL before redirecting.
Let's say we have a boolean state isDarkModeEnabled that define if the dark theme should be enabled.
useIsDarkModeEnabled.ts
Now let's see how we would use this state in our react app.
MyComponent.tsx
We can also update the state and track it's updates outside of react:
A more production ready implementation of useIsDarkModeEnabled is available here.
Now let's see how we would carry our isDarkModeEnabled to our login theme.
If you really want to go the extra miles and avoid having the white flash of the blank html before the js bundle have been evaluated here is a snippet that you can place in your public/index.html if you are using powerhooks/useGlobalState.
Looking for submitting a PR? Thank you!
Here is an example of a good PR that adds support for a page.
If you need to edit the i18n resources it should be done here (and not in the src/lib/i18n/generated_kcMessages dir).
The keycloakify components are a plain React translation of the default theme that comes with Keycloak v11.0.3.
You can download the FTL/CSS source files the components are based on with the following command:
npx -p keycloakify download-builtin-keycloak-theme
then select version 11.0.3 (Video demo).
Let's assume you have made some change to the keycloakify codebase and you want to test those changes before submitting a PR.
Assuming you have cloned keycloakify in ~/github/keycloakify this is how you would proceed.
Open a new terminal window
Now you are able to test your local version of Keycloakify in the test app and make sure everything works as expected.
If you want to link your local version of keycloakify in your own app instead of the keycloakify-demo-app just run yarn link_in_test_app <your_app>
Heads over the development instruction if you are not already familiar with the process of testing your Keycloakify themes: